Intro:
Windows 10 by default shows account names on the login screen. There are instances in which you wish to hide these names from this screen but not disable these accounts.
One such instance may be that you don't have enough computers and or devices to warrant a domain setup but you need to give the printer access to a local machine to save its scans to via the network (not USB).
In this instance the printer requires a networked location to save the scans to as well as a username and password to access said location. It's not wise to give it the username and password for your user because if the printer has an exploit and you're an admin user, well I bet you can guess what happens next.
The best way to approach this is to create a standard user that only has access to that networked folder and nothing else. Read and write permissions are fine (provided you're backing up that location elsewhere), else setup that user with write credentials only (unless the printer bitches about read access).
Once that user is created, Windows 10 by default will show that new user on the sign in screen. It's best not to proactively divulge potential users on the system to guests who can walk up and see the screen. Especially if your "printer" user is using the password of "printer".
Fortunately you can hide any name you want from the Windows sign in screen.
*Be advised I've only tested this in Windows 10 Pro and Enterprise.
*Make sure you're using an admin account to do this or you will not be able to make changes to the registry!
Solution:
Identify the username you wish to hide:
1. Open a command prompt and type:
Find the username in the list and make note of it (Windows usernames are not case sensitive however Microsoft Active Directory is case aware).
For this example we'll target "user1".
Adding User Into Registry and Making New Keys:
1. Right click Start --> Run --> regedit.exe --> Ok --> Yes on UAC prompt.
2. Either browse to the following location or copy/paste it into the bar under the menu buttons at the top and hit Enter:
HKEY_LOCAL_MACHINE\SOFTWARE\Microsoft\Windows NT\CurrentVersion\Winlogon
3. On the key (yellow folder) to the left labeled, "WinLogon", right click it and click New --> Key.
4. Name the new key "SpecialAccounts" and press Enter when done.
5. Right click on the newly created "SpecialAccounts" key and create another key called, "UserList".
6. Right click on "UserList" or in the empty white space on the right and create a new DWORD (32-bit) Value.
7. Replace, "New Value #1" with the user name you noted in the beginning, ie "user1". Do not include the quotes.
8. There's two values this new DWORD value can have. 0 or 1. A value of 0 means the username will not be displayed on the sign in screen. A value of 1 means it will be shown. The base must be hexadecimal and not decimal.
9. The changes take effect once you've logged off your current user.
You can see the difference below:
 |
| value of 0 |
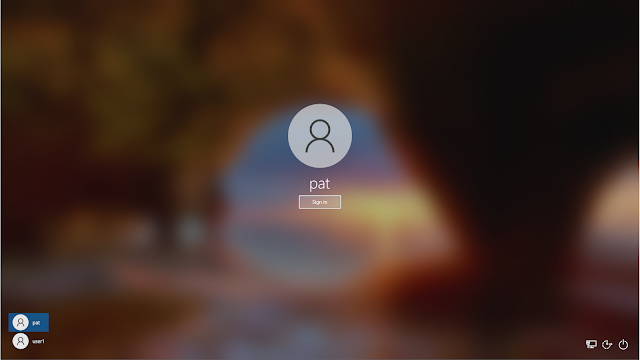 |
| value of 1
|
Solution (short):
1. CMD --> net user --> make note of user name.
2. Regedit (as admin).
3. Navigate to "HKEY_LOCAL_MACHINE\SOFTWARE\Microsoft\Windows NT\CurrentVersion\Winlogon".
4. Select key, "Winlogon" create new key named, "SpecialAccounts".
5. Select key, "SpecialAccounts" create new key named, "UserList".
6. Create new 32-bit dword value for each username you wish to hide.
7. Value of 0 hides user from sign in screen / Value of 1 shows user on sign in screen.
8. Log off and verify.
Conclusion:
As you can see in the above example it works. This tutorial only hides the user from the sign in screen.
If you wish to disable users this can be done by Right clicking Start --> Computer Management --> Local Users and Groups --> Users, select user, right click, Properties --> select "Account is Disabled" --> Ok.
*If you wish to come back to the same key in "regedit" when reopening it, close regedit prior to logging off.
👽


